
Debugging low-level code, such as bootloaders operating in real mode, can be quite challenging due to the lack of sophisticated debugging tools available at higher levels of programming. There are no debuggers, no logs, no stack traces, and no operating system to help you.
One of the most reliable and time-tested debugging techniques in this environment is printing the values of CPU registers to the screen. By observing register values at critical execution points, you can understand what the CPU is actually doing and quickly locate bugs in your bootloader logic.
This article walks step by step through:
- Why printing registers is useful
- How text output works in real mode
- Printing numbers in decimal and hexadecimal
- Using these helpers to debug Stage 1 and Stage 2 bootloaders
Why Print Register Values?
Printing register values is a straightforward method to:
- Verify the correctness of your code.
- Ensure that the CPU is in the expected state at critical points.
- Debug unexpected behavior by observing the values in registers.
At this level, if you can print, you can debug.
Printing Register Values
As we all know that registers stores data in decimal format. But in low level we mostly deal with the hexadecimal data. So we should have function for printing both decimal as well as hexa-decimal value.
First we will add some helper functions, which ease up our job:
common/print16.inc:
1️⃣ PrintNewLine:
; ********************************
; PrintNewline

; This prints a newline, used to signify the end of a line of text and the beginning of a new one.
; It is equivalent to '\n' in C/C++
; ********************************
PrintNewline:

	pusha
	mov ah, 0x0E            ; BIOS function to print character
	mov al, 0x0A            ; Newline character (Line feed)

	int 0x10                ; Call BIOS interrupt to print character

	mov al, 0x0D            ; Carriage return character
	int 0x10                ; Call BIOS interrupt to print character
	popa
ret
Line Feed (Line Feed, \n, ASCII 0x0A):
- Moves the cursor down to the next line but does not return to the beginning of the line.
- In a text environment, it advances the vertical position of the cursor by one line.
Carriage Return (Carriage Return, \r, ASCII 0x0D):
- Moves the cursor to the beginning of the line but does not advance to the next line.
- It resets the horizontal position of the cursor to the start of the line.
- Historically used by old printers and typewriters.
Carriage Return + Line Feed (CR+LF, \r\n):
- Moves the cursor to the beginning of the line and then down to the next line.
- This combined effect is similar to pressing the
Enterkey on a keyboard, which starts a newline for text output.
| Character | Effect |
\n (LF) | Moves cursor down |
\r (CR) | Moves cursor to column 0 |
\r\n | Start a new line (Enter key behavior) |
Visual Representation :-
Consider the following text:
Hello, World!
This is a new line.
If Hello, World! is printed first, the cursor is at the end of the line:
Hello, World!_
Executing PrintNewline will:
- Move the cursor down to the next line (due to the Line Feed).
- Move the cursor to the beginning of the line (due to the Carriage Return).
Resulting in:
Hello, World!
_
Where _ represents the cursor position, ready for the next line of text.
2️⃣ Printing a Decimal Number (16-bit):
We would need a function, which would print the value of an register.
Registers store number sin binary, but humans read decimal or hexadecimal. To print a decimal number, we must:
- Extract digits using division by 10
- Push them onto the stack as ASCII digits.
- Pop each digit from the stack and print it.
To do this, we need to:
- Use division to extract each decimal digit (starting from the least significant digit).
- Convert each digit to its ASCII equivalent.
- Use BIOS interrupt
0x10to print each character.
High-Level Algorithm:
- Input: number in
AX - Repeatedly divide by 10
- Push remainders (digits) onto the stack
- Pop and print digits
Dry Run:
Initialization:
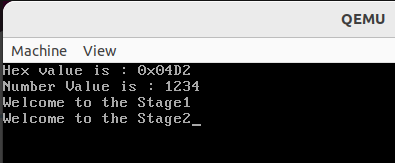
AX = 1234 (decimal)
BX = 0 (counter for the number of digits)
CX = 10 (used to divide AX by 10 to get individual decimal digits).

|     |
|     |
|     |
|     |
|     | <-- Top of Stack
+-----+
Iteration 1:
AX = 1234, CX = 10
div cx:
       AX / CX = 1234 / 10 = 123 (quotiend stored in
       AX), remainded = 4 (stored in DX)
The remainder (4) is converted to an ASCII character:
       DX = 4 -> DX + 48 = 52 (ASCII code for '4').
       Push 52 onto the stack.
Increment BX = BX + 1
          BX = 0 + 1 = 1

 |     |
 |     |
 |     |
 |     |
 |  4  | <-- Top of Stack
 +-----+
  Stack
Iteration 2:
AX = 123, CX = 10, BX = 1
div cx:
       AX / CX = 123 / 10 = 12 (quotiend stored in
       AX), remainded = 3 (stored in DX)
The remainder (4) is converted to an ASCII character:
       DX = 4 -> DX + 48 = 51 (ASCII code for '3').
       Push 52 onto the stack.
Increment BX = BX + 1
          BX = 1 + 1 = 2

 |     |
 |     |
 |     |
 |  2  | <-- Top of Stack
 |  4  |
 +-----+
  Stack
Iteration 3:
AX = 12, CX = 10, BX = 2
div cx:
       AX / CX = 12 / 10 = 1 (quotiend stored in
       AX), remainded =  (stored in DX)
The remainder (4) is converted to an ASCII character:
       DX = 4 -> DX + 48 = 50 (ASCII code for '2').
       Push 52 onto the stack.
Increment BX = BX + 1
          BX = 2 + 1 = 3

 |     |
 |     |
 |  2  | <-- Top of Stack
 |  3  |
 |  4  |
 +-----+
  Stack
Iteration 4:
AX = 1, CX = 10, BX = 3
div cx:
       AX / CX = 1 / 10 = 0 (quotiend stored in
       AX), remainded = 1 (stored in DX)
The remainder (4) is converted to an ASCII character:
       DX = 4 -> DX + 48 = 49 (ASCII code for '1').
       Push 52 onto the stack.
Increment BX = BX + 1
          BX = 3 + 1 = 4

 |     |
 |  1  | <-- Top of Stack
 |  2  |
 |  3  |
 |  4  |
 +-----+
  Stack
Print Loop: Print by popping digits from the stack
Print Iteration 1:
 |     |
 |  1  | <-- Top of Stack
 |  2  |
 |  3  |
 |  4  |
 +-----+
  Stack

BX = 4
Pop value from stack top into AX
    AX = 1
    Print character '1' via PrintChar16BIOS
    Decrement BX
              BX = BX - 1
                 = 4 - 1 = 3
Print Iteration 2:
 |     |
 |  2  | <-- Top of Stack
 |  3  |
 |  4  |
 +-----+
  Stack

BX = 3
Pop value from stack top into AX
    AX = 2
    Print character '1' via PrintChar16BIOS
    Decrement BX
              BX = BX - 1
                 = 3 - 1 = 2
Print Iteration 3:
 |     |
 |     |
 |  3  | <-- Top of Stack
 |  4  |
 +-----+
  Stack

BX = 2
Pop value from stack top into AX
    AX = 3
    Print character '1' via PrintChar16BIOS
    Decrement BX
              BX = BX - 1
                 = 2 - 1 = 1
Print Iteration 4:
 |     |
 |     |
 |     |
 |  4  | <-- Top of Stack
 +-----+
  Stack

BX = 1
Pop value from stack top into AX
    AX = 3
    Print character '1' via PrintChar16BIOS
    Decrement BX
              BX = BX - 1
                 = 2 - 1 = 0
Loop Terminate:
 |     |
 |     |
 |     |
 |     | <-- Top of Stack
 +-----+
  Stack

BX = 0

Since BX becomes 0 means we have printed all the digits
then the loop will get terminated.
Function Code:
; ********************************
; PrintWordNumber
; IN:
; 	- AX: NumberToPrint
; ********************************
PrintWordNumber:
	; Save all general-purpose registers
	pusha

	; Initialize variables
	xor 	bx, bx        ; Clear BX to use it as a counter for the number of digits
    mov 	cx, 10         ; Set CX to 10, the divisor for converting number to digits

	.DigitLoop:
	    xor 	edx, edx        ; Clear EDX before division
	    div 	cx             ; Divide AX by 10
	    ; After div: AX contains quotient, DX contains remainder

	    ; Convert remainder to ASCII
	    add dx, 48         ; Convert digit to ASCII ('0' = 48)

	    ; Store ASCII digit on the stack
	    push 	dx
	    inc 	bx             ; Increment digit count

	    ; If quotient (AX) is zero, we're done converting digits
	    cmp ax, 0
	    jnz .DigitLoop       ; If AX is not zero, repeat the loop

	.PrintLoop:
		; Pop ASCII digit from stack into EAX
		pop 	ax

		; Print the character in AX
		call 	PrintChar16BIOS

		; Decrease digit count in BX
		dec 	ebx
		jnz 	.PrintLoop     ; If BX is not zero, print next digit

    ; Restore all general-purpose registers
    popa
ret                       ; Return from the PrintNumber routine
This function prints the number stored in the AX register using BIOS interrupts to display each digit on the screen. This routine converts the number into its individual digits, stores them in ASCII format on the stack, and then prints each digit by popping them off the stack.
3️⃣ Printing a Hexadecimal Number (16-bit)
Hexadecimal is often more useful than decimal when debugging bootloader because:
- Memory addresses are shown in hex
- BIOS values are documented in hex
- CPU registers naturally align to hex digits

Leave a comment
Your email address will not be published. Required fields are marked *